by Dan Zeorlin
Automatic overhead garage door openers make terrific conveniences. The simple, inexpensive, and easy-to-adjust "Park Aid" adaptation described here is a great custom tool, extending the ability to know where your car is in relation to the garage door. You might never risk parking the car too far forward in your garage again or loathe fearing the car was parked too short, exposing its rear to be struck by the closing door.
Garage Door (and Garage Door Opener) Positions
- Open
- Closed
- Inside
- Outside
- Up
- Down
Take it to the next level.
- Attach a Park Aid ball at the end of a cord.
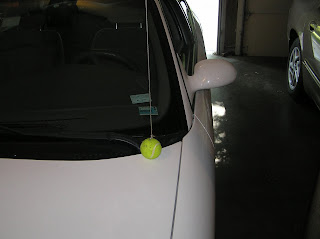
- Attach an eye screw to the ceiling in a location which will allow the extended tethered ball (Down Position #2) to contact the car windshield when parked ("Inside Position" #1).
- Thread cord through ceiling eye and attach an adjustable stop to cord. Note: The fine tuned position of the stop will be set later (stop prevents over-extension of tether based on car "Inside Position #1" with weight of driver included on specific automobile). For now merely approximate the required distance of the tethered extension.
- Fix an eyelet (attach point) near the top of the garage door (possibly easier while door is in the "Closed Position #2).
- Thread cord through door attach point (door in "Closed Position #2" and Park Aid in "Up Position #1").
- Options: Your configuration might be enhanced through the use of additional guides (eyes) located along the length of the cord and small ballast weights added to the cord. These can be added to control the drape of the cord if it becomes excessive (door "Open Position #1" and car "Inside Position #1").
- Occasionally you may wish to reset the stop position based on driver preferences and optimize the Park Aid ("Down Position #2).
PHOTO DETAILS
This depiction of the ceiling eye screw shows an adjustable stop needing tweaks.
The presence of a hook keeps the cord near the ceiling.
Garage Door Closed Position #2.
Routing via guide attached to ceiling.
Garage Door Open Position #1.
Park Aid Down Position #2.
Routing via guide attached to door track.
Park Aid Up Position #1.


No comments:
Post a Comment